
The secret to visiting America’s iconic landmarks isn’t finding the perfect photo op; it’s surviving the reality by radically re-engineering your expectations.
- Most “must-see” sites are disappointing because the Instagram image clashes with the gritty, crowded, commercialized reality.
- The best strategy is to treat these places like an anthropological study of tourism itself, not a sacred destination.
Recommendation: Instead of focusing on the main attraction, find value in the periphery—the side streets, the specific histories, and the smart hacks that let you bypass the chaos.
Let’s be honest. You’ve seen the photos: a pristine star on a gleaming sidewalk, the Hollywood sign hovering magically in the background. You’ve imagined the glamour, the history, the feeling of walking in the footsteps of legends. Then you arrive. The reality is a crush of tourists, bootleg Elmo characters demanding a photo fee, sidewalks stained with things you’d rather not identify, and a relentless sensory assault from souvenir shops. This is the “Paris Syndrome” of American tourism—the crushing disappointment when an iconic mirage meets a gritty reality. The Hollywood Walk of Fame is perhaps its greatest monument.
The standard advice is always the same: go early, wear comfortable shoes, be aware of your surroundings. This is not advice; it’s a list of basic survival requirements for leaving your house. It doesn’t address the fundamental problem: your expectations are set for a movie set, but you’ve landed in a crowded outdoor mall. You are not visiting a landmark; you are the product being processed through a tourist-monetization machine. The key isn’t to just endure it, but to change the entire frame of reference.
This guide offers a different approach. We will embrace the cynicism. We will treat these overhyped destinations not as places to be revered, but as case studies in “tourist trap anthropology.” By understanding the mechanics of the disappointment delta—the gap between the promise and the reality—you can learn to extract genuine value and even enjoyment from the chaos. This isn’t about how to see the Walk of Fame; it’s a manual for how to re-engineer your travel brain to survive, and even appreciate, America’s most iconic letdowns.
This article breaks down how to apply this reality-check mindset to some of the most famous (and potentially disappointing) spots across the USA. The following sections offer specific strategies for navigating these tourist traps, turning potential frustration into a smarter travel experience.
Contents: A Survivor’s Guide to America’s Most Overhyped Attractions
- Why Times Square Is Just a Giant Outdoor Mall with Screens?
- How to Photograph the Golden Gate Bridge from the Marin Headlands?
- Empire State vs. Top of the Rock: Which View is Actually Iconic?
- The Line Mistake at the Liberty Bell That Wastes Your Whole Morning
- When to Visit Disney World to Avoid the ’10/10′ Crowd Level Days?
- Upper Loop vs. Lower Loop: Which to Prioritize for a 2-Day Trip?
- The Viral Pastry Mistake That Wastes 2 Hours of Your Day
- How to Experience NYC on a $150 Daily Budget Without Missing the Icons?
Why Times Square Is Just a Giant Outdoor Mall with Screens?
Times Square isn’t the “Crossroads of the World” anymore; it’s the crossroads of a Sunglass Hut, a giant M&M’s store, and an Olive Garden. The spectacle is no longer about Broadway’s energy but about the sheer, blinding power of digital advertising. Accepting this fact is the first step to not hating it. As an exercise in tourist trap anthropology, it’s fascinating. It’s a real-time display of hyper-commercialism that mirrors the evolution of places like the Hollywood Walk of Fame, which also transformed from a genuine entertainment district into a tourist-centric commercial zone. The goal here is not to find authentic New York culture—it’s to observe the machine at work.
To do this without losing your mind, you need a strategy. The sensory assault is real, so find a perch. The elevated atrium at the Renaissance New York Times Square Hotel or the steps of the Stephen A. Schwarzman Building (the main library branch) offer grand views without the chaos of being in the middle of the pedestrian flow. From these urban oases, you can observe the spectacle from a safe distance. For a more interactive approach, turn it into a game. Create a “Brand Bingo” card with a checklist of ads and screens to spot. This shifts your role from a passive victim of advertising to an active, critical observer. And whatever you do, avoid weekends. Foot traffic drops significantly on weekdays, turning the experience from pure chaos into manageable spectacle.
How to Photograph the Golden Gate Bridge from the Marin Headlands?
The Golden Gate Bridge is one of the few icons that rarely disappoints—unless you’re a photographer stuck in the wrong place at the wrong time. The classic postcard view doesn’t just happen; it’s engineered with timing and location. The Marin Headlands across the bay offer the most dramatic perspectives, but knowing where and when to go is the difference between a masterpiece and a hazy, backlit snapshot. According to local photography guides, the optimal window for Golden Gate Bridge photography is from 7 AM to 11 AM, when the morning light illuminates the “International Orange” paint against the city or sea.
A professional workflow is essential. Start at Hawk Hill about 30 minutes before sunrise for breathtaking high-angle shots as the first light hits the towers. As the sun gets higher, descend to Kirby Cove for a completely different, low-angle perspective from the beach (but always check tide times and gate closures online first, as access can be restricted). Two hours after sunrise is the perfect time to head to Battery Spencer for that iconic, compressed view with the city skyline in the background. If you’re lucky enough to encounter San Francisco’s famous fog, don’t despair. Use manual focus set to infinity, bump your exposure compensation up (+1 to +2 stops) to keep the fog from looking gray, and use a higher ISO (400-800) to maintain a fast shutter speed.
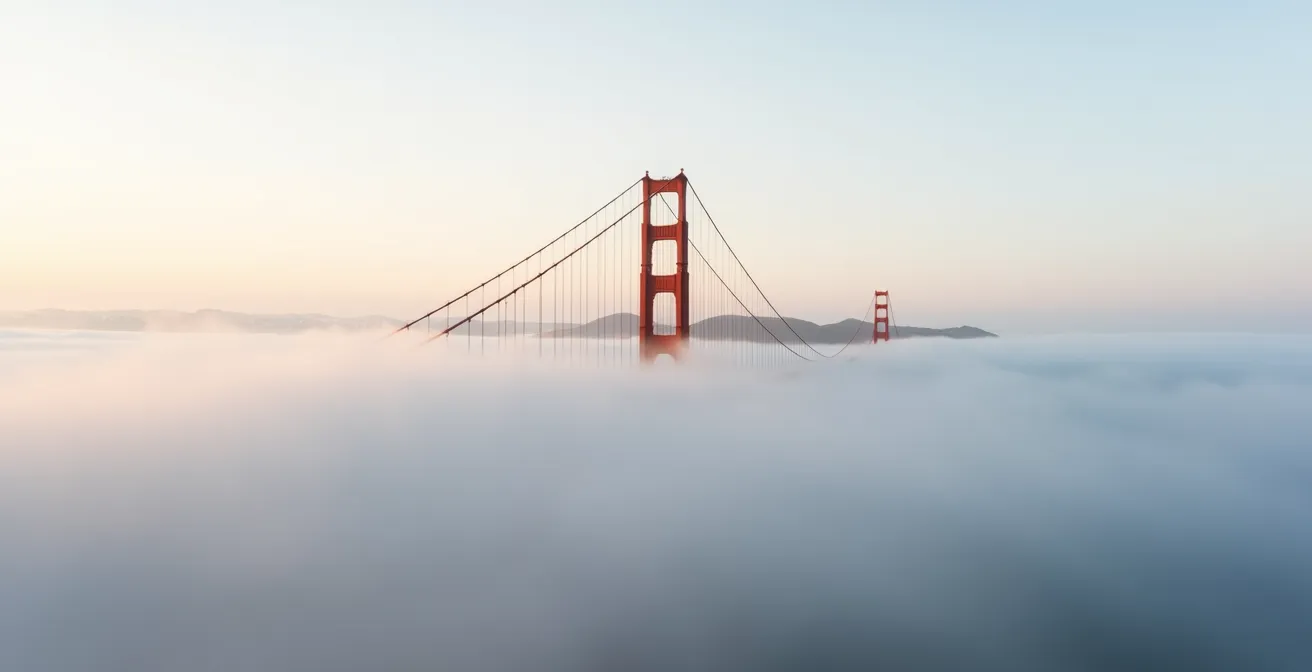
As the image above illustrates, fog can transform a standard landscape shot into an ethereal, minimalist composition. The key is to see the weather not as an obstacle, but as a creative element. For a final, different look, position yourself on the west side of the Golden Gate Bridge Welcome Center at sunset with a telephoto lens (200mm or more) to capture stunning compressed shots of the bridge as the day ends.
Empire State vs. Top of the Rock: Which View is Actually Iconic?
Here’s the great New York observation deck paradox: to get the most iconic photo of the NYC skyline, you can’t be *in* its most iconic building. The “iconic” view is the one with the Empire State Building in it. Therefore, the photographer’s choice is unequivocally Top of the Rock. From its open-air decks, you get a perfect, unobstructed shot of the Empire State Building anchoring the midtown and downtown skylines. The Empire State Building, by contrast, is the historian’s choice. You’re inside the legend, experiencing its Art Deco lobby and historic atmosphere, but the one thing your 360° photos will be missing is the building itself.
The decision boils down to what you want to achieve. Are you there to take *the* photo, or are you there to be inside *the* landmark? The experiences are also vastly different. Top of the Rock uses a timed-entry system, which significantly controls crowd flow and makes for a more pleasant, less-crowded experience. The Empire State Building is a bigger name that draws bigger crowds, leading to a more congested feel, especially at peak times. Timing also plays a role in the decision matrix. The Empire State is arguably best at sunrise, letting you feel the city wake up from its historic perch. Top of the Rock shines at sunset, allowing you to photograph the moment the Empire State Building’s famous lights turn on, a truly magical sight.
To help you decide which tourist trap is worth your money, here is a clear breakdown:
| Factor | Empire State Building | Top of the Rock |
|---|---|---|
| Best For | Historian’s Choice – You’re inside the icon itself | Photographer’s Choice – Empire State IN your shot |
| Experience | Art Deco lobby, museum exhibits, historic atmosphere | Timed-entry system, open-air decks, less crowded |
| Photo Opportunities | 360° city views WITHOUT Empire State | Perfect shots WITH Empire State as subject |
| Best Time | Sunrise to feel the city wake up | Sunset to photograph ESB lights turning on |
| Crowd Level | Higher – iconic status draws more visitors | Lower – timed entry controls flow |
The Line Mistake at the Liberty Bell That Wastes Your Whole Morning
The single biggest mistake you can make at the Liberty Bell in Philadelphia is assuming you have to wait in line to see it. That long, snaking queue you see is for security screening to get *inside* the pavilion for an up-close view. But the bell is housed behind a massive glass wall on the Chestnut Street side, offering a perfectly clear, unobstructed view 24/7—for free, with zero waiting. Unless you have a deep, personal need to be in the same room as the bell, you can see it, take your photo, and be on your way to Independence Hall in under five minutes while everyone else is still shuffling forward in line.
This “value extraction” is about identifying the core experience you want. Do you want to see the bell, or do you want to experience a security line? Crowds at these sites operate on predictable schedules. For instance, similar to how Hollywood Walk of Fame star ceremonies, which run from 11:30 AM to 12:15 PM, create surges, the Liberty Bell crowds swell immediately after large tour groups exit nearby Independence Hall. If you absolutely must go inside, the only sane way to do it is to arrive exactly at opening (9 AM) on a weekday or visit during the deep off-season of January and February. By adopting this cynical-but-practical mindset, you reclaim hours of your day.

While the outside view is efficient, getting up close does allow you to appreciate the intricate texture of the famous crack. The choice is yours: efficiency or detail. If you opt for the former, you can enhance the experience by downloading the official National Park Service app and listening to the audio tour while viewing the bell from the street.
Your Action Plan: The Zero-Wait Liberty Bell Strategy
- View the Liberty Bell through the large glass window on Chestnut Street, available 24/7 with no line.
- If entering is a must, visit during the off-season (January-February) or in the last 30 minutes before closing.
- Check the Independence Hall tour schedule online and avoid the area immediately after a large group exits.
- Download the official NPS app for an audio tour to listen to while viewing the bell from the outside.
- For the absolute shortest wait to get inside, arrive at the 9 AM opening on a weekday.
When to Visit Disney World to Avoid the ’10/10′ Crowd Level Days?
There is no such thing as an “empty” Disney World. Let’s start there. The goal is not to find solitude but to avoid the soul-crushing, “10/10” crowd level days where you spend more time in switchback queues than on rides. This requires strategic planning based on data, not just wishful thinking. According to 2025 crowd calendar data, the lowest crowd periods at Disney World are the first two weeks of December and late January after MLK Day. These windows are your best bet for a manageable experience. Conversely, any holiday week (Thanksgiving, Christmas, Spring Break) is a guaranteed recipe for human gridlock.
Beyond choosing the right weeks, your daily strategy matters. Most guests arrive for “rope drop” and instinctively rush to the newest, most popular attraction (like TRON or Guardians of the Galaxy). The smart, counter-intuitive move is the Rope Drop Reversal. Start at the back of the park with older, high-capacity rides like Pirates of the Caribbean or the Haunted Mansion. For the first two hours, you’ll be moving against the main flow of traffic, enjoying walk-on or short-wait rides. While the masses are stuck in a two-hour line for one ride, you’ll have done five. Use the Genie+ service to book the popular rides for the afternoon, when lines are at their peak anyway. During the hottest and most crowded part of the day (2-4 PM), retreat to long indoor shows or rides to escape both the heat and the crowds. Finally, mobile order all your food at least two hours in advance. This simple trick alone will save you from another hour wasted in a restaurant line.
Upper Loop vs. Lower Loop: Which to Prioritize for a 2-Day Trip?
Trying to “see” Yellowstone in two days is like trying to read a novel by looking at its cover. It’s impossible. You have to make a brutal but necessary choice, and that choice is between the park’s two main road systems: the Upper Loop and the Lower Loop. This isn’t a matter of which is “better,” but which aligns with your priority. The Lower Loop is the geothermal wonderland. It’s where you’ll find Old Faithful, the Grand Prismatic Spring, and countless bubbling, steaming thermal basins. It’s a non-stop spectacle of bizarre and colorful geology, making it the better choice for families with shorter attention spans. The drives between features are relatively short.
The Upper Loop is the wildlife safari. This is the domain of the Lamar and Hayden Valleys, vast expanses of grassland where you have the best chance of seeing bison, wolves, and bears. It also features the Grand Canyon of the Yellowstone and its dramatic waterfalls. However, this loop requires patience. Wildlife viewing can involve long periods of waiting, and the drives between key points are longer. Your choice for a 2-day trip depends on your primary interest: otherworldly landscapes or majestic animals. For photographers, the Lower Loop offers vibrant colors and steam effects, while the Upper Loop provides dramatic canyon views and the thrill of wildlife photography.
To help you make the right sacrifice, this table outlines the key differences:
| Factor | Lower Loop (Geothermal) | Upper Loop (Wildlife) |
|---|---|---|
| Main Attractions | Old Faithful, Grand Prismatic, thermal basins | Lamar & Hayden Valleys, Canyon, waterfalls |
| Best For Families | Constant visual spectacles, shorter drives | Requires patience, longer drives between spots |
| Wildlife Viewing | Limited – mainly around thermal features | Excellent – bison, wolves, bears in valleys |
| Photography | Colorful thermal features, steam effects | Wildlife, dramatic canyon views |
| Time Commitment | 8-10 hours full loop with stops | 8-10 hours full loop with stops |
For those who refuse to choose, a hybrid itinerary is possible. Spend Day 1 on the southern half of the Lower Loop (Old Faithful, Grand Prismatic) and Day 2 on the northern part of the Lower Loop leading into the Hayden Valley/Canyon section of the Upper Loop. This approach acknowledges what you’ll miss but optimizes for maximum impact, giving you a taste of both geothermal wonders and prime wildlife habitat.
The Viral Pastry Mistake That Wastes 2 Hours of Your Day
You saw it on TikTok: a gravity-defying croissant, a cruffin oozing with a ludicrous amount of cream. Now you’re standing in a two-hour line for it, your precious vacation time ticking away for a single pastry. This is the modern tourist trap. The mistake isn’t wanting the pastry; it’s believing the line is the only way to get it. Just as with major attractions, similar to Hollywood attractions, viral bakeries see lowest crowds during early morning hours or weekdays. But even that isn’t the smartest hack.
The first rule of bypassing food lines is to check for online pre-orders. Many famous bakeries offer this, sometimes weeks in advance. A few minutes of planning can save you hours of standing. If that’s not an option, try the “last hour” gambit: show up in the final hour before closing. It’s a calculated risk—the item might be sold out—but often the line has vanished. Statistically, the quietest time for most bakeries is a Tuesday afternoon around 2 PM, the dead zone between the lunch rush and the after-work crowd. The ultimate local’s move, however, is to find the alternative. Ask a local barista or shopkeeper: “Where do you go for a great pastry that doesn’t have a line?” You’ll almost always be directed to an equally delicious, yet undiscovered, gem just a few blocks away.

The true value is often in the craftsmanship and quality, not the social media hype. Following a bakery’s social media can also provide an edge; they often announce “soft openings” of new locations, giving you a chance to visit before the crowds discover them. It’s about being a smarter consumer of hype.
Key Takeaways
- The biggest source of travel disappointment is the gap between the Instagram promise and the gritty reality. Adjust your expectations downward.
- Treat crowded, commercialized tourist traps as anthropological studies. Observe the chaos instead of letting it consume you.
- Real value is found by using clever hacks and insider strategies to bypass lines, avoid crowds, and find smarter alternatives.
How to Experience NYC on a $150 Daily Budget Without Missing the Icons?
New York City runs on money, but experiencing its iconic soul doesn’t have to bankrupt you. The key to a budget trip is ruthless value extraction and knowing where the “free version” of a paid experience exists. It’s about applying the same logic from the Hollywood Walk of Fame or the Liberty Bell to an entire city: separate the core experience from the overpriced packaging. You want to see the Statue of Liberty, but do you need to spend $24 and half a day to set foot on the island? Or do you just want that incredible harbor view and a great photo?
If it’s the latter, the Staten Island Ferry is your answer. This commuter ferry runs 24/7, is completely free, and sails right past the Statue of Liberty. The 25-minute journey each way provides photo opportunities and skyline views that rival, and in some cases surpass, the paid tours. This one move saves you both money and precious time. Apply this logic everywhere. Instead of paying for an observation deck, get drinks at a rooftop bar in Brooklyn for a stunning Manhattan skyline view. Instead of a paid museum, explore the world-class street art of the Bushwick Collective. Walk the Brooklyn Bridge, wander through Central Park, and soak in the electric atmosphere of neighborhoods—all of which costs nothing. Food can be a budget killer, but NYC’s best food is often its cheapest: a classic slice of pizza, a bagel, or exploring the food carts of Jackson Heights, Queens. A $150 daily budget is tight, but entirely possible if you think like a local, not a tourist.
Stop chasing the perfect, cliché photo and start your journey as a smarter, more cynical, and ultimately more satisfied traveler. By applying this reality-check mindset, you can navigate any tourist trap and find an experience that is genuinely your own.