
Surviving a multi-day festival isn’t about the gear you pack; it’s about the survival systems you master before you even leave home.
- Rookie mistake: Focusing on a simple packing list instead of building robust systems for hydration, shelter, and energy management.
- Veteran mindset: Understand the *why* behind every choice, from the type of tent stakes you use to the electrolyte-to-water ratio you drink.
Recommendation: Stop thinking about *what* to bring and start thinking about *how* you’ll solve the core survival problems: heat, wind, exhaustion, and resource scarcity.
Every year, thousands of first-timers descend on the Indio desert, armed with brand-new flower crowns and a packing list they found online. And every year, thousands get absolutely wrecked by the brutal reality of Coachella. They think sunscreen and a wide-brimmed hat are enough. They are wrong. The standard advice—”stay hydrated,” “wear comfy shoes”—is laughably inadequate. It treats festival survival like a simple checklist when it’s really a high-stakes logistics game.
Here’s the truth the veteran knows: your gear is useless without the knowledge to deploy it correctly. Surviving Coachella, or any major US camping festival for that matter, is not about what’s in your bag. It’s about mastering a set of core survival systems. It’s about developing an environmental IQ that works as well in the dust storms of Bonnaroo as it does in the urban sprawl of Lollapalooza. This isn’t just a packing list; it’s a mindset upgrade.
We’re going to move beyond the platitudes and into the pro-tips. We’ll deconstruct the real threats, from the infamous “festival flu” to the high-velocity winds that turn cheap canopies into kites. By the end of this guide, you won’t just have a better packing list; you’ll have the strategic framework to conquer any festival environment the USA can throw at you.
This field manual breaks down the essential systems every festival-goer must master. From managing your health to building a wind-proof shelter, each section tackles a critical element of festival survival, providing the hard-won knowledge that separates the rookies from the veterans.
Contents: The Ultimate Festival Survival Field Manual
- Why ‘Festival Flu’ Knocks You Out for a Week After Bonnaroo?
- How to Build a Shade Structure That Withstands High Winds?
- Lollapalooza vs. Austin City Limits: Which City Festival Is More Chill?
- The Water Bottle Mistake That Sends 500 People to the Med Tent
- How to Plan Your Schedule to See 10 Bands a Day Without Sprinting?
- The Food Storage Error That Attracts Grizzlies to Your Campsite
- How to Connect Your RV to Shore Power Without Blowing a Fuse?
- How to Find Free Legal Parking for Your Camper Van Overnight?
Why ‘Festival Flu’ Knocks You Out for a Week After Bonnaroo?
That post-festival sickness you feel isn’t just a cold. “Festival Flu” is a systemic collapse caused by a perfect storm of stressors: sleep deprivation, poor nutrition, dehydration, and constant overstimulation. One of the most overlooked culprits is sound. In fact, music festivals often average over 100 decibels—louder than a chainsaw—which puts immense stress on your body, even if you’re enjoying the music. Your immune system, already battered by dust and sharing air with 100,000 people, simply gives up.
Surviving the festival is only half the battle; the other half is recovery. A proactive approach is non-negotiable. Treating the week after a festival with the same strategic planning as the event itself is the key to avoiding a full-blown crash. It’s not about popping a few vitamin C tablets; it’s a structured protocol to restore your body’s equilibrium. This means focusing on three pillars: rehydration, nutrition, and sleep restoration.
Don’t wait until you feel sick. Start your recovery on the car ride home. The goal is to systematically counteract the damage done. Here’s a veteran’s protocol for getting back to human form in seven days:
- Day 1-2: Focus entirely on rehydration. Your body is desperate for electrolytes. Use solutions like Pedialyte or Liquid I.V. and aim to drink at least one water bottle every two hours to restore balance.
- Day 3-4: Shift to nutrient-dense foods. Your body needs building blocks to repair itself. Think high-quality protein and vitamins from real food, not processed snacks. A trip to a grocery store like Whole Foods or Trader Joe’s is a better investment than another takeout meal.
- Day 5-6: Force a sleep schedule reset. You’ve destroyed your circadian rhythm. Aim for 8-9 hours of uninterrupted rest. If needed, a low dose of melatonin can help you get back on track.
- Day 7: Manage the cortisol crash. After days of adrenaline, the drop-off can trigger anxiety and exhaustion. Counteract it with light exercise (a walk, not a HIIT class) and mindfulness. Guided meditation on an app like Calm or Headspace can make a huge difference.
How to Build a Shade Structure That Withstands High Winds?
In a desert festival like Coachella, shade isn’t a luxury; it’s your primary life-support system. The sun will cook you, but it’s the wind that will destroy your camp. Every year, the campground is littered with the mangled carcasses of cheap pop-up canopies that turned into kites. The rookie mistake is buying a flimsy shelter. The veteran move is knowing how to engineer a standard canopy to be bomb-proof.
The principles come from the harshest festival environment on Earth: Burning Man. Veterans there have perfected techniques to secure shelters in winds that can exceed 40mph. As a case study in desert engineering shows, this involves replacing the flimsy pegs that come with your tent with heavy-duty alternatives and adding structural tension. The key is to anchor your shelter deep into the ground and use external forces to keep it there.
These techniques include using 12-inch rebar stakes hammered deep into the ground (always check festival rules first), which offer vastly superior grip in loose soil compared to standard pegs. Another pro-tip is to use heavy-duty ratchet straps crisscrossed over the top of the canopy and anchored to the rebar stakes, creating immense downward pressure. Finally, the “tennis ball trick”—placing tennis balls on the ends of guy lines or where they meet the tarp—prevents the fabric from tearing under high tension.
This image demonstrates a properly reinforced shade structure, built to survive the demanding conditions of a desert festival.
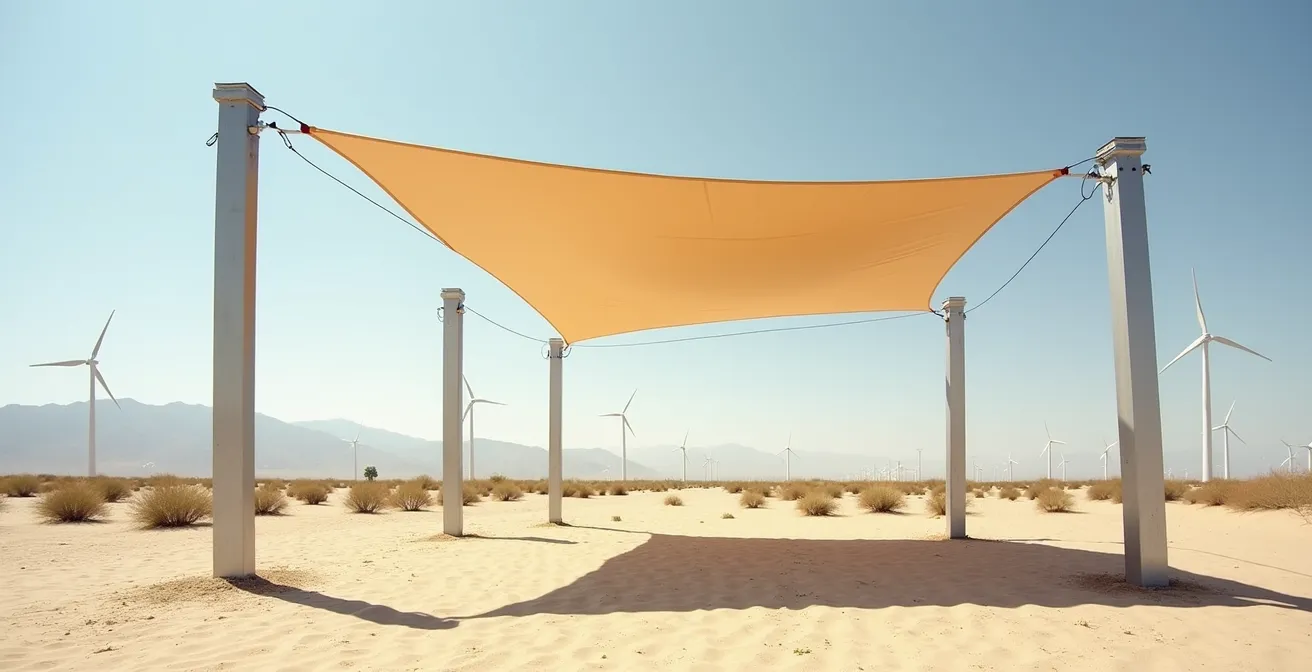
As you can see, the stability comes from external reinforcement, not the structure itself. The ratchet straps provide critical tension, while the heavy-duty stakes create an unshakeable foundation. This setup is the difference between having a shady oasis and chasing your canopy across the polo fields.
Lollapalooza vs. Austin City Limits: Which City Festival Is More Chill?
Not all festivals are a brutal fight for survival in a desert. A key part of the veteran mindset is developing “Environmental IQ”—the ability to read and adapt to your specific surroundings. City festivals like Chicago’s Lollapalooza and Austin City Limits (ACL) present entirely different challenges and opportunities than a camping festival. The question isn’t just “which has the better lineup?” but “which environment is more conducive to a relaxed experience?” This is the ‘chill factor’.
The chill factor is a mix of crowd density, cost, local laws, and access to escape zones. As one festival comparison expert from the Music Festival Guide 2024 notes:
Austin City Limits has more breathing room and better shade options, but Chicago’s legal cannabis and later bar hours create a different kind of freedom.
– Festival comparison expert, Music Festival Guide 2024
This highlights the trade-offs. ACL offers a physically more relaxed space within Zilker Park, while Lollapalooza’s urban setting in Grant Park is denser but benefits from Illinois’ more liberal policies and Chicago’s vibrant nightlife. To make an informed choice, you have to break down the key metrics.
This comparative analysis shows how different factors contribute to the overall vibe of each festival. A lower crowd density and cheaper beer might make ACL seem more “chill” on paper, but for some, the legal freedom in Chicago is the ultimate form of relaxation.
| Factor | Lollapalooza (Chicago) | Austin City Limits |
|---|---|---|
| Average Beer Price | $15-18 | $10-14 |
| Crowd Density | 125,000 daily attendance | 75,000 daily cap |
| Bathroom Wait Time | 15-20 minutes peak | 10-15 minutes peak |
| Cannabis Policy | Legal (Illinois) | Illegal (Texas) |
| Escape Zones | Grant Park shade limited | Zilker Park trees abundant |
Ultimately, “chill” is subjective. Do you value physical space and natural shade, or legal freedom and a later curfew? Analyzing a festival through this lens before you buy a ticket is a hallmark of an experienced attendee.
The Water Bottle Mistake That Sends 500 People to the Med Tent
Here it is: the single biggest rookie mistake at any hot-weather festival. It’s not forgetting sunscreen or wearing bad shoes. It’s thinking that simply drinking a lot of water is enough to stay hydrated. In 100+ degree desert heat, you are sweating out not just water, but critical salts and minerals called electrolytes. Chugging plain water while losing electrolytes is a fast pass to the medical tent with hyponatremia—a dangerous condition where your blood becomes too diluted.
The signs of severe dehydration are subtle but serious. According to seasoned attendees, a key red flag is when you realize you’ve been drinking 3 liters in 2 hours without needing to urinate. This is a critical warning sign that your body is in distress and hoarding every drop of liquid it can. Your hydration system needs to be about electrolyte balance, not just water volume. This means actively adding back the minerals you’re losing.
A proper hydration protocol is a non-negotiable system. It starts before you even feel thirsty. Your goal is to constantly replenish, keeping your body in a state of equilibrium. Here’s how the pros do it:

The right gear, like an insulated bottle, is part of the solution, but the real key is what you put inside it. Your water should be enhanced to replace what you’re sweating out. Follow this protocol:
- Enhance Your Water: Always mix electrolyte powders like Pedialyte or Liquid I.V. into your water. These are specifically designed for rapid rehydration and contain the right balance of sodium, potassium, and glucose.
- Drink on a Schedule: Don’t wait until you’re thirsty. In desert conditions, you must drink a minimum of one 16oz water bottle every two hours. Set an alarm on your phone if you have to.
- Keep it Cool: Use a double-walled insulated bottle like a Hydro Flask or a similar brand. Drinking warm water is nauseating and less effective. Cold water is more palatable, meaning you’ll drink more of it.
- Tablet Power: Bring effervescent electrolyte tablets like Nuun. They are easy to carry and can turn any bottle of plain water into a life-saving drink.
- Consider a Filter: If you have a sensitive stomach, the minerals in festival-provided water can sometimes cause issues. A filter bottle from a brand like LifeStraw or Brita can help mitigate this.
How to Plan Your Schedule to See 10 Bands a Day Without Sprinting?
The festival lineup drops, and you immediately start circling a dozen “must-see” acts. The rookie plans their day by time alone, creating a fantasy schedule that involves sprinting from the main stage to the Sahara tent in five minutes. This is a recipe for exhaustion and disappointment. The veteran knows that managing your energy is as important as managing your time. The key is to think geographically.
As documented in a case study on efficient festival navigation, experienced attendees use a strategy called “geographic clustering.” Instead of zig-zagging across the entire festival grounds, they group their schedule by stage location. This means sometimes sacrificing the first 15 minutes of one set to see the entirety of three others in the same area. It’s about trade-offs. The real walking time between major stages at Coachella can be brutal: expect 15 minutes from the Main Stage to the Sahara Tent and at least 12 minutes from the Outdoor Theatre to the Yuma tent. Factoring in crowds, that time can easily double. Geographic clustering can save you over an hour of walking per day, which is an hour more you can spend enjoying music.
Building an efficient schedule is a strategic process. It requires pre-planning and the right tools. Here’s a step-by-step approach to crafting a realistic and enjoyable plan:
- Map It Out: Before you arrive and cell service becomes non-existent, screenshot the festival map and the official set times. Have them saved as the lock screen on your phone for quick access.
- Use Third-Party Apps: Official festival apps can be clunky. Use tools like Clashfinder to visualize set overlaps and plan your routes more effectively.
- Embrace the “Split Set” Strategy: If two must-see acts have conflicting times, commit to a split. Plan to miss the first three songs of one set to catch the last five songs of the other. Seeing part of a show is better than missing it entirely.
- Set Early Alerts: Your phone is your personal assistant. Set alarms for 20 minutes before a must-see act is scheduled to start. This is your “time to move” signal, accounting for walking and bathroom stops.
- Establish Precise Meeting Points: “Meet at the main stage” is useless. Use the labeled speaker towers or sound booths as your landmarks (e.g., “Meet at speaker tower B1, left of the stage”). They are unique and easy to find.
The Food Storage Error That Attracts Grizzlies to Your Campsite
Okay, let’s be clear: you are not going to find a grizzly bear wandering through the Coachella campgrounds. However, the title makes a critical point about food security. The principles required to keep a 600-pound bear out of your food are the same gold-standard practices that will keep raccoons, squirrels, and other critters from raiding your cooler. Many US festivals are held in or near wilderness areas where wildlife is a real concern. Following protocols from the National Park Service (NPS) is the ultimate pro-move for food storage anywhere.
The core mistake is thinking your tent or car is a safe place for food. It’s not. The smell of your snacks can attract animals from hundreds of yards away. In many wilderness areas, the rules are strict for a reason. For example, bear canisters are mandatory in Yosemite and other National Parks because bears can and will break into cars for a bag of chips. While you may not need a bear canister at Coachella, applying the underlying logic of separating food, cooking, and sleeping areas is just smart camping.
The NPS has a foolproof system called the “100-Yard Triangle.” It’s designed for deep wilderness but is a brilliant framework for any campsite. It creates physical separation between the things that smell (food/cooking) and the place you sleep, minimizing the chance of a nocturnal visitor, whether it has four legs or two.
Action Plan: The Bear-Proof Food Storage Triangle
- Establish Your Zones: Set up your cooking area (grill, stove) at least 100 yards (or as far as practical in a designated campground) downwind from your tent.
- Create a Storage Point: Store all food, coolers, and scented items (like toothpaste and deodorant) another 100 yards from both your tent and your cooking area, forming a triangle.
- Maintain Separation: Never, ever bring food or scented items into your sleeping area. This is the single most important rule of safe camping.
- Odor-Proof Your Gear: Even in non-bear areas, use LOKSAK odor-proof bags for your food and trash. This is highly effective against smaller, more common campsite thieves like raccoons and squirrels.
- Secure Your Coolers: A simple cooler is not animal-proof. Use bungee cords or ratchet straps to secure the lid tightly to prevent wildlife from prying it open.
How to Connect Your RV to Shore Power Without Blowing a Fuse?
For those who upgrade their festival experience to an RV, a new set of challenges emerges. The most dangerous is electricity. Improperly connecting your RV to the campground’s shore power pedestal can do more than just blow a fuse; it can fry your vehicle’s entire electrical system. This is a costly mistake, as a case study on RV electrical safety highlights that faulty campground wiring can result in over $5,000 in repair bills. The issue often lies in misunderstanding the difference between 30-amp and 50-amp connections common at US campgrounds, and failing to protect your system from power surges or low voltage.
The single most important piece of gear you can own for an RV is a high-quality Electrical Management System (EMS), not just a simple surge protector. Brands like Progressive Industries or Southwire make units that cost around $500, which seems steep until you compare it to the cost of replacing your converter, microwave, and air conditioner. An EMS actively monitors the power from the pedestal and will automatically shut it off if it detects dangerous conditions like a power surge, low voltage (which can damage motors), or incorrect wiring.
Even with an EMS, there is a strict sequence of operations you must follow every single time you connect to power. This procedure minimizes the risk of electrical arcs and ensures all systems are safe before you draw any power. It’s a non-negotiable ritual for any RV owner.
- Step 1: Breaker Off. Before you touch anything, ensure the power breaker on the campground pedestal is in the ‘OFF’ position.
- Step 2: Protector First. Plug your EMS/surge protector into the pedestal outlet first, without the RV cord attached.
- Step 3: Connect to RV. Once the EMS has had a moment to analyze the power and indicates it’s safe (usually with green lights), connect your main RV power cord to the EMS.
- Step 4: Breaker On. Only now should you flip the pedestal breaker to the ‘ON’ position.
- Step 5: Verify Inside. Go inside your RV and check your voltage meter or EMS remote display to confirm you have correct and stable power before turning on any appliances, especially the A/C.
Key Takeaways
- Festival survival is a game of systems, not just gear. Master your strategies for hydration, shelter, and energy.
- Your environment dictates your strategy. Adapt your approach whether you’re in a desert, a forest, or a city park.
- Proactive recovery is non-negotiable. Plan your post-festival week to combat the systemic crash known as “Festival Flu.”
How to Find Free Legal Parking for Your Camper Van Overnight?
For the growing van life contingent at festivals, the game changes once you leave the official grounds. Finding a safe, legal, and free place to park your camper van overnight is a crucial skill. You can’t just pull over anywhere; “stealth camping” requires knowledge of local laws and, more importantly, unwritten community rules. The goal is to be invisible and leave no trace, ensuring these precious free spots remain available for others.
The US van life community has established a code of conduct for overnighting in places like retail parking lots. A case study of this etiquette reveals that while many Walmart and Cracker Barrel locations are famously friendly to RVs and vans, it’s not a given. The unspoken rule is that you are a guest, not a camper. This means you must always ask a store manager for permission first, park in the furthest corners of the lot, arrive late (after 8 PM), and leave early (before 8 AM). Setting up camp chairs, awnings, or grills is strictly forbidden and is the fastest way to get these privileges revoked for everyone.
Beyond retail lots, a treasure trove of free camping options exists if you know where to look. The modern van lifer’s toolkit is digital, relying on crowdsourced apps and public land maps to navigate the landscape of free and legal overnight spots. Mastering these tools is essential for life on the road.
- iOverlander: This is the bible for free camping. It’s a crowd-sourced app showing everything from established free campsites to tolerated street parking spots, complete with user reviews on safety and cell service.
- The Dyrt & Campendium: These apps are excellent for finding both paid and free campsites. Their powerful filters allow you to search for options with specific amenities, cell service coverage, and detailed user reviews with photos.
- BLM and USFS Land: The USA has vast tracts of public land managed by the Bureau of Land Management (BLM) and the US Forest Service (USFS). These areas often allow “dispersed camping” for free, typically for up to 14 days. You need to know the rules, such as how far you must be from water sources, but they offer true freedom and beautiful scenery.
Stop thinking like a tourist and start acting like a survivor. Master these systems, and you won’t just endure your next festival—you’ll own it. The next logical step is to apply this mindset and begin building your personalized festival survival plan today.